Step 1: Apply Backing Tape
To start, apply double-stick tape to the back of every sheet of plywood except for the bottom layer, to make assembly quick and easy after laser cutting. You only need to apply the tape to the parts of the wood you will be cutting. For this project we used about 4 pieces of tape per piece of wood.

Step 2: Prepare Artwork
In our design software we’ll select our first design. On the Fusion Pro 24 we can cut two layers at a time. Select the artwork and print it to the Laser Dashboard, choosing “Selection Only”.

Step 3: Set up Artwork in the Laser Dashboard
In the Epilog dashboard, position your artwork and input your engraving settings. On a 100-watt Fusion Pro 24 we used 25% speed, 100% power, and 10% frequency. Print the job to the laser, and repeat for any remaining layers.

Step 4: Laser Cut Plywood
At the laser, select the job and press go to start cutting the plywood pieces. Repeat for each layer of the sign.

Step 5: Apply Primer and Paint to the sign pieces
Place each layer of the sign on a piece of cardboard and coat them with your primer spray, making sure to lift each piece and coat the burnt edges. It may take multiple layers of spray to get an even coating.

Once the primer has finished drying, you can spray paint all of your layers the colors of your choosing, and allow them to dry.

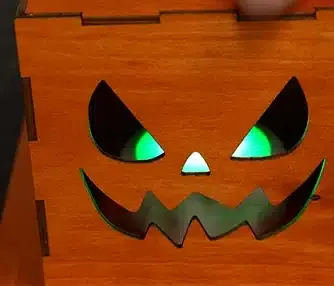
Step 6: Assemble the Halloween Sign
Once the paint is dry, you’re ready to assemble the sign. Peel the protective layer from the backing tape and stack each layer on top of the other.

Add an optional coating of shellac to help protect the paint.

Now your multi-layered Halloween sign is ready to be displayed and enjoyed!

Target Markets for Halloween Signage
Retail & Small Business
- Boutique stores and gift shops – eye-catching seasonal décor to enhance displays and attract customers.
- Cafés, bars, and restaurants – festive interior or exterior signage to promote Halloween specials or events.
- Pop-up shops and seasonal markets – unique, durable signage for booths and displays.
Education & Community
- Schools and libraries – decorative signage for fall festivals, fundraisers, or classroom décor.
- Community centers and local event organizers – signage for haunted houses, pumpkin patches, or town celebrations.
Corporate & Commercial
- Office environments – companies adding festive flair to lobbies, reception areas, or break rooms.
- Property management groups – décor for apartment complexes, leasing offices, or community spaces.
- Event planners and decorators – reusable signage for themed corporate parties or private events.