How to Engrave Single-Color Plastics with a Fiber Laser:
A Step-by-Step Guide
Engraving Plastics
with a Fiber Laser
Engraving plastics with a fiber laser is a highly effective way to create high-contrast, permanent marks without removing material. Whether you are creating livestock identification tags (cow tags), serial number plates, or branded promotional items, the process relies on a chemical reaction within the plastic’s additives.
In this tutorial, we explore two different methods: using a high-speed Galvo system and a high-capacity Flatbed fiber laser.
Precision Engraving with a Galvo Fiber Laser System
The Galvo laser uses high-speed mirrors to move the beam, making it the ideal choice for quick, precise projects like single or small groups of cow tags.
Step 1: Alignment using the Iris™ Camera
Using the Epilog Laser Dashboard, capture a background image of your laser bed. Copy this image and paste it into your graphic software (like CorelDRAW, Adobe Illustrator, or AutoCAD). This allows you to “see” exactly where your tags are placed on the table for perfect graphic alignment.
Step 2: Graphic Placement
Drag your names, logos, or serial numbers over the images of the tags in your software. Once aligned, select only the graphics (not the background image) and send the job back to the Laser Dashboard.
Step 3: Material Settings for 100W MOPA Fiber Laser
For a crisp, black mark on light-colored plastics, using a 100W MOPA Fiber laser source, use the below settings.
-
Speed: 100%
-
Power: 60%
-
Frequency: 1%
-
Waveform: 4
-
Spacing: 0.0003
-
Angle: 45°
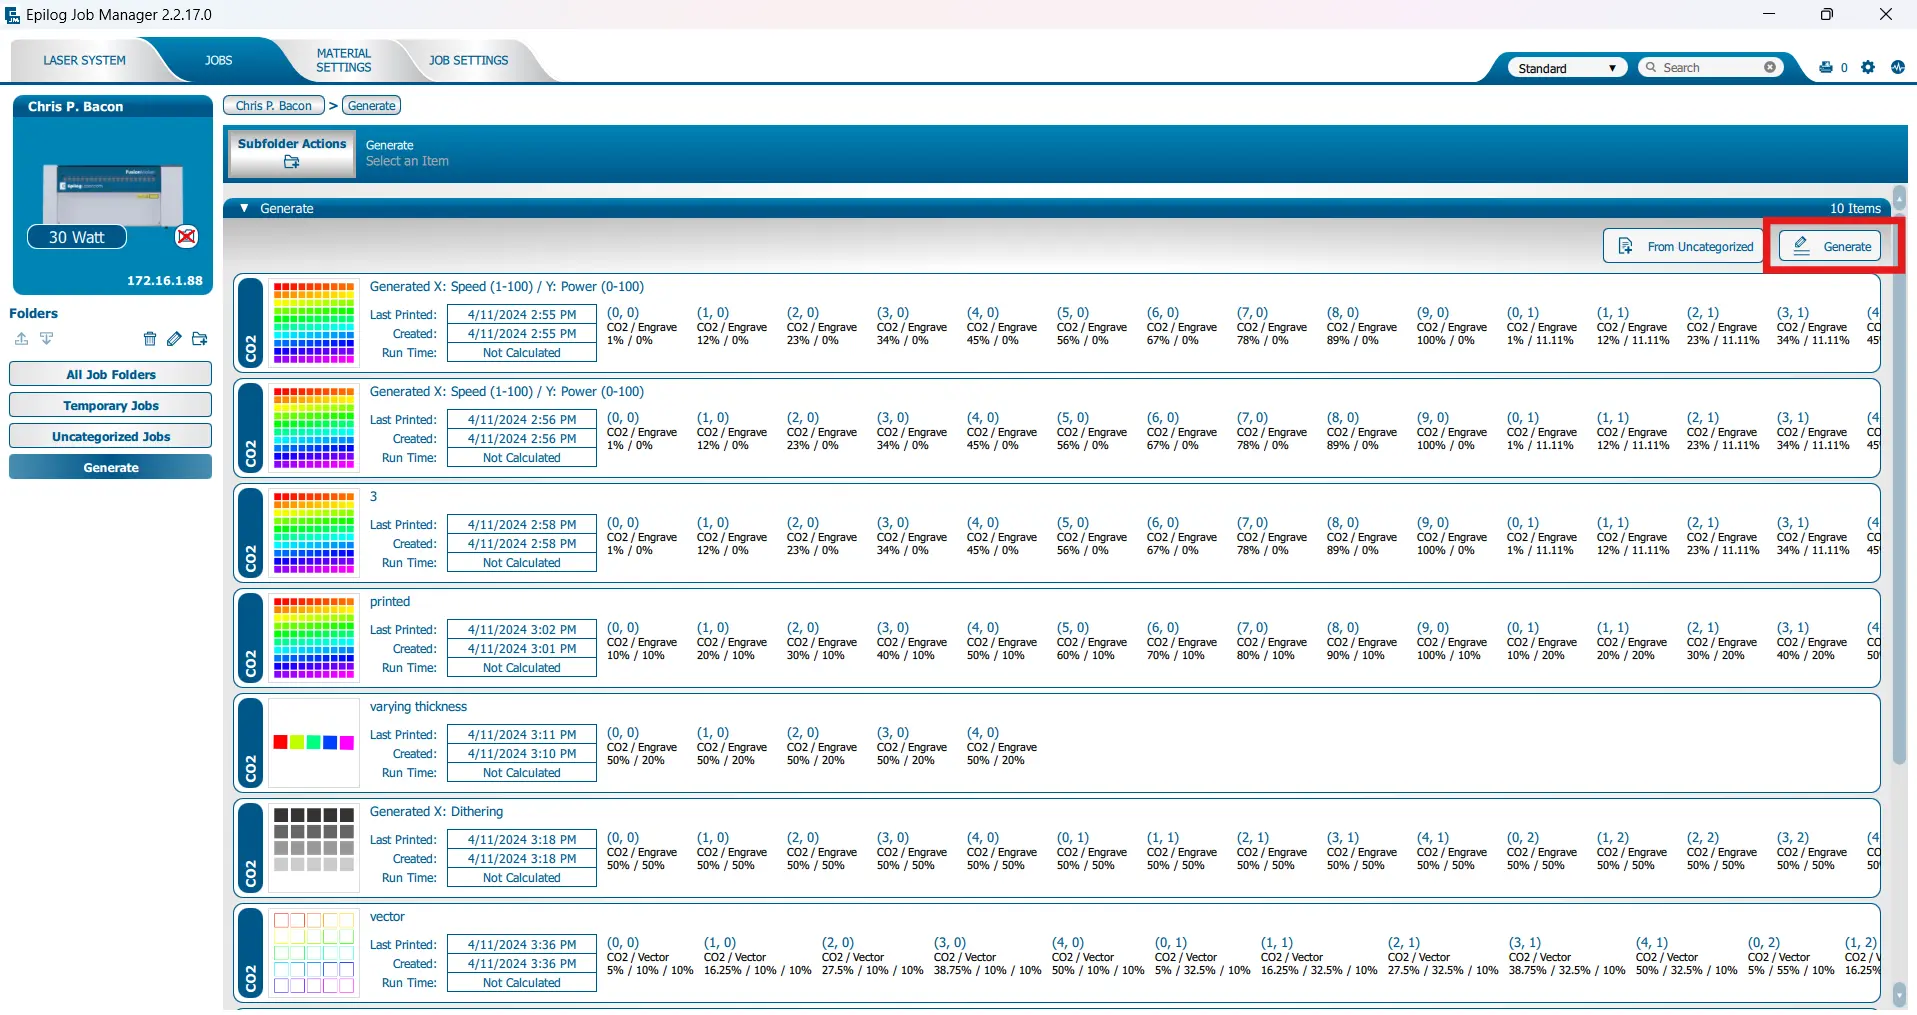
To experiment on your material, you can use the settings generator in the Epilog Job Manager. The generate button is located in the upper right corner as indicated by the red rectangle in this image.
High-Volume Production on a Flatbed Fiber System
If you need to engrave dozens of items at once, the flatbed system is the better choice. While it uses a flying optic system (which is slower than Galvo mirrors), the larger work area allows for “set it and forget it” bulk production.
Step 1: Use a Laser-Cut Jig for Alignment
To maximize efficiency, create a jig out of taskboard or acrylic to hold your tags in place. Because the jig ensures every piece is in a fixed position, you don’t need to use the camera for every job. Simply place your tags in the slots and run your file.
Step 2: Settings for 60W MOPA Fiber Flatbed Laser System
On a 60W flatbed system, your settings will differ slightly to achieve the same high-contrast black mark:
-
Resolution: 400 DPI
-
Speed: 90%
-
Power: 100%
-
Frequency: 1%
-
Waveform: 10
Galvo vs. Flatbed: Which Fiber Laser is Right for You?
| Feature | Galvo Fiber System | Flatbed Fiber System |
|---|---|---|
Speed | Ultra-fast (approx. 30 seconds per full design tag) | 15 min for full design on 24 tags |
Work Area | Up to 6″ x 6″ | Up to 24″x24″ |
Best For | Small batches and rapid prototyping | High-volume bulk production and large batches |
Understanding the Science: Why Fiber Lasers Mark Plastic
Fiber lasers don’t typically deep engrave plastic like a CO2 laser might. Instead, the beam reacts with internal additives in the material.
-
Light Plastics: The laser creates a chemical change that turns the plastic black.
-
Dark/Black Plastics: The pigments often react to turn white or light grey.
Pro Tip: Always run a grid pattern test when working with a new plastic. Because every manufacturer uses different additives, your “perfect” black mark might require a slight adjustment in frequency or waveform.
FAQ
Other Tips & Tricks
Ready to Elevate
Your Marking Capabilities?
Fiber lasers offer a level of versatility that is enables modern fabrication and branding. Whether you are marking metal or specialized plastics, Epilog has a system to fit your workflow.